
Create the Perfect Environment for Thriving Plants
One of the biggest challenges in container gardening is ensuring that your plants’ roots stay healthy and free from excess moisture. Good drainage is essential for container gardens, as water can’t flow away as it would in a regular garden bed. If your containers don’t drain properly, water can build up, causing root rot and preventing oxygen from reaching the roots. Here’s how to improve drainage in your container gardening soil to keep your plants happy and thriving.
1. Choose the Right Potting Mix 🌱
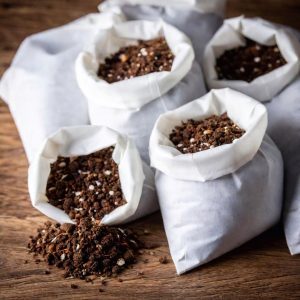 The first step to improving drainage is selecting a high-quality potting mix, not regular garden soil. Potting mix is specifically designed for containers, with a lighter, fluffier texture that promotes airflow and prevents compacting. Garden soil, on the other hand, can be too dense for containers, causing poor drainage and restricting root growth.
Best Features to Look for in Potting Mix:
- Light Texture: Good potting mixes are formulated to stay loose and airy, allowing water to flow through without compacting.
- Moisture-Retaining Materials: Look for ingredients like peat moss or coconut coir, which hold moisture without waterlogging.
- Perlite or Vermiculite: These materials are added to potting mixes to create space between particles, improving drainage and preventing soil compaction.
Tip: If you’re reusing old potting soil, add a bit of fresh potting mix to keep it light and restore nutrients that may have been depleted.
2. Add Drainage Material to the Bottom of the Container 🪨
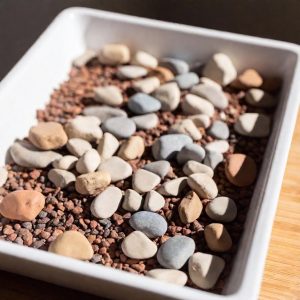 Adding a layer of drainage material at the bottom of your container can help prevent water from pooling around your plants’ roots. This layer creates space for excess water to drain away from the soil, reducing the risk of root rot.
Options for Drainage Material:
- Small Stones or Gravel: A layer of small rocks or gravel at the bottom of the container can create a reservoir for excess water. Just be careful not to overdo it—about an inch of material is usually enough.
- Broken Pottery or Ceramic Shards: Recycle broken pots by placing pieces at the bottom of your container. They work similarly to gravel, allowing water to flow while holding soil in place.
- Perlite: Perlite can also be used as a base layer, especially in larger containers, as it’s lightweight and holds moisture without soaking the soil.
Tip: Make sure the container has drainage holes. Without these, even the best drainage material won’t help, as the water will still have nowhere to escape.
3. Mix in Perlite, Sand, or Grit for Extra Drainage 🌾
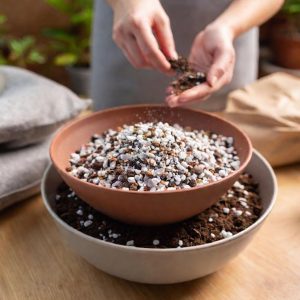 If you’re working with a heavy potting mix, or if you want to give your plants a little extra drainage, consider mixing in additional materials like perlite, coarse sand, or grit. These ingredients help break up the soil, creating air pockets and improving drainage.
How to Mix for Better Drainage:
- Perlite: Perlite is a lightweight, volcanic material that keeps soil loose and airy. Mix in about 10–20% perlite with your potting soil for an added drainage boost.
- Coarse Sand: A small amount of coarse sand (not fine beach sand) can help improve drainage by adding weight and structure to the soil. Aim for a mix of about 1 part sand to 4 parts potting mix.
- Grit or Small Pebbles: Grit or small pebbles are often used in cactus and succulent soil mixes. Adding a handful can improve drainage in regular potting mixes, particularly for plants that need very little moisture.
Tip: If you’re growing succulents or other plants that prefer dry conditions, consider using a cactus potting mix, which is formulated to drain quickly and is perfect for these types of plants.
4. Water Strategically to Avoid Over-Saturating Soil 💧
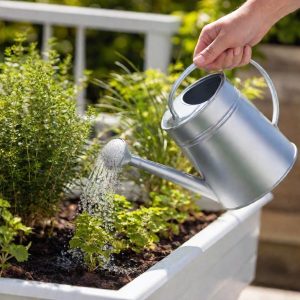 Good watering habits are just as essential as proper drainage materials in preventing waterlogged soil. When watering, aim to moisten the soil evenly without over-saturating it. Keep an eye on the weather, too—rain and cooler temperatures can mean your plants need less water.
Tips for Watering Container Gardens:
- Use a Gentle Flow: Pour water slowly and evenly across the soil surface. This helps prevent soil compaction and allows water to reach all parts of the container.
- Check Soil Moisture: Before watering, check the top inch of soil. If it feels dry, it’s time to water. If it’s still damp, wait a day or two before checking again.
- Use Self-Watering Containers: Self-watering containers have a reservoir at the bottom that allows plants to draw up water as needed, preventing the risk of over-watering.
Tip: In hot weather, containers may need watering more frequently. But for most plants, letting the soil dry out slightly between waterings is ideal.
5. Keep an Eye on the Drainage Holes 🕳️
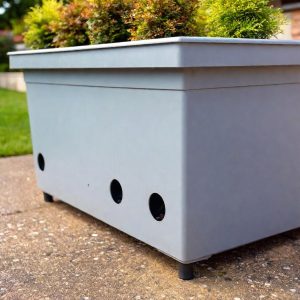 Even if you start with good drainage holes, over time, soil and debris can block them, especially if your containers are outdoors. Regularly check the drainage holes to make sure they’re clear, allowing water to escape easily.
How to Maintain Drainage Holes:
- Raise the Container: Placing the container on pot feet or a small stand can help prevent holes from clogging, especially on soft or uneven ground.
- Inspect Regularly: Every few weeks, check the bottom of the container to ensure water can flow freely. If it’s blocked, use a small tool or stick to clear the hole.
Tip: If you’re repotting, it’s a good time to give your containers a rinse and clear out any blocked drainage holes.
With the right soil, materials, and techniques, you can create the ideal drainage setup for your container garden. By choosing a quality potting mix, adding drainage layers, mixing in materials like perlite, and watering carefully, your plants’ roots will stay healthy and well-aerated, ready to thrive in their urban oasis.
A well-drained container garden isn’t just easier to care for—it also keeps your plants vibrant, ensuring they flourish in their new home. Happy planting!